A basic method for moving Outlook OST document to another PC
 christanglina
Share this Post to earn Money ( Upto ₹100 per 1000 Views )
Moving a Outlook OST document to another place could be difficult if you are not familiar with the suitable tools to complete all of the duties engaged in. Following the advice in this post will help you to move the OST record to another computer without any issues. Furthermore advised is the use of a computerised OST to PST converter device OST, which can operate with a fast OST document sending out mechanism.
Moving the OST record to another machine should not cause any problems.
Using tried-and- proven procedures is really vital if one is to complete difficult activities like mailing out OST records. This part of the paper will offer a quick overview of the tools required to convert OST records to PST. Reading and following the method through its whole helps one prevent any letdown.
Along with the area your OST document occupies on your framework, know its name.
You should first be aware of the place where you could find an OST file before you start the procedure of shifting one to another machine. Therefore, should you be interested about the whereabouts of these papers on your system, we will furnish all the necessary information here. Should you wish to find the name and location of your OST file on your system, you should use the guidelines below. Windows practically all have the same interaction, hence they are not different.
1.Type Control Board both at the S and Windows keys.
2.Choose the Control Board then forward it.
3.Check at this stage to see if Little Symbols is the default categorisation customising value.
4. Find the Mail option on the Control Board and then click on it.
5. A little chat window meant for the Mail Arrangement will open now. You should most definitely click the "Information Documents" button at that moment.
6.A window titled Record Settings will show once you are done. Make sure you are on the Information Records tab; this should be the default setting; but, if you are not now on that page, make sure you touch on it.
7. At this stage, select the record for which the OST document section you need to build. One mentions a territory, as you will find in the following. You were searching for it. Note the area and gather your OST records. To straight access the envelope, you may also choose the perfect OST file and then click on the Open Record Area tab.
8. The OST file you earlier stored will be opened from the registry. Look for the OST record you need access to.
Here now we will start trading the OST record. Two alternative approaches will be used to complete the work: a high-level OST to PST converter instrument second and a product module Outlook offers first.
Documenting OST's broadcast from Outlook
Outlook's profusion of innovative features also offers a product utility whereby consumers may copy OST files from one machine into another in the form of a PST file. Act in a way that resembles the ones described below:
1.First from the menu, choose Outlook; then choose the Record option.
2.Click the Import/Commodity button in second step following Open and Product choice.
3.Select Product to a Record from the Import and Commodity Wizard and immediately click the Straightaway button.
4.Then click the Straightaway option after selecting the Outlook Information Record (.pst) file type.
By now you should decide on the envelope you shall distribute and ensure the checkbox marked "Incorporate subfolders" is activated. Make a direct link click.
Click the Browse button; then, choose a location to save your PST file; subsequently, click the Finish button to start the process of sending the file.
Navigating to the location found in the previous step will let you verify that your PST document is accurate.
Converting OST file with advanced OST to PST converter tool
Outlook is prone to many mistakes and flaws even if it is a great product from Microsoft. Should Outlook neglect to forward your OST file for whatever reason, you have the choice to use another approach to move the OST file to another machine.
Here we will employ a robotised tool able to translate OST files into PST files. Strong calculations included in this converter will enable us to effectively translate any OST file into PST file. The OST to PST converter instrument offers a basic to operate connecting point to help the change cycle open.
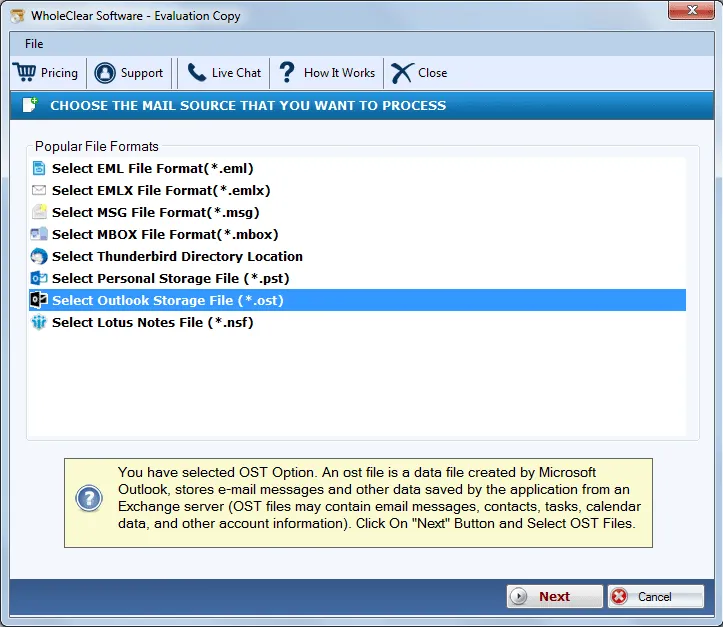
Complete Safety: Free Download
A. Arrangement the OST in your framework as follows:
B. Clicking the Peruse button will help you choose the OST record once the product has been installed and turned on. You will have to click the Following button to go forward.
C. Here you can view the contents of the OST paper including To save, click this.
D.Choose a PST record from the MS Outlook, then grab a photo right away.
E.Apply the information channels relevant to the post box in line with your prerequisites. Choose the straightaway choice.
F.Choose whether to part a PST record at this point or link a prefix to control it. Click the link directly.
G.Click the Peruse option to then select your Saving Inclinations, thereby giving the freshly produced document direction. Click the Finish button to begin the saving mechanism.
H.Once you have saved the data, choose the "alright" button.
Also Read :- Transfer IMAP OST files to New Machine/Computer
The Last Words
Customers who have been given access to director honours also have the capacity to establish a new profile inside the objective framework and subsequently match their past correspondence with the new profile. Other people can safely move OST files to another person's computer by either sending them out using Outlook or switching them over using an OST converter following the short process covered in this blog. Under a perfect world, let's employ the expert OST to PST converter program to promptly and accurately obtain the OST file.


